


Checking the oil in your car is one of the simplest yet most important maintenance routines you can perform. The engine oil acts as the lifeblood of your vehicle, keeping all moving parts lubricated and protected against friction and heat. Without sufficient or clean oil, your engine can quickly wear out, overheat, or even fail completely. By learning how to check the oil in your car, you can maintain engine efficiency, extend its lifespan, and avoid costly repairs. This guide provides a detailed, step-by-step process that ensures you get accurate readings and keep your engine running in its best condition.
Prepare the Car for an Accurate Oil Check
Preparation is the first and most crucial step before checking the oil level. The accuracy of your reading depends on how well the car is set up for inspection.
Start by parking your car on a level surface to prevent oil from pooling on one side of the oil pan. Turn off the engine and wait for about five to ten minutes so the oil can settle back into the sump. This short waiting period ensures the oil measurement you take is consistent. You should also make sure the vehicle is in park, the parking brake is engaged, and the hood is securely lifted before beginning.
It’s best to perform the oil check when the engine is warm but not hot. A slightly warm engine helps the oil flow properly, giving a truer reading of the actual level inside the crankcase. Keep a clean cloth or paper towel handy to wipe the dipstick, and ensure you have adequate lighting if you are working indoors.
Tools You’ll Need Before Checking
To check your oil, you only need a few basic items. Have a clean rag, a pair of gloves, and a funnel available in case you need to top up the oil. Keep a small container of the manufacturer-recommended engine oil nearby, and always use the correct grade specified in your vehicle’s manual.
Safety Precautions to Follow
Safety should come first. Let the engine cool slightly to avoid burns from hot components. Ensure the car cannot move by engaging the parking brake. If you’re working in a closed garage, keep the door open to maintain airflow and avoid exposure to fumes.
Locate and Remove the Engine Oil Dipstick
The dipstick is your main tool for checking engine oil levels and condition. Knowing where it is and how to handle it properly is essential for accurate readings.
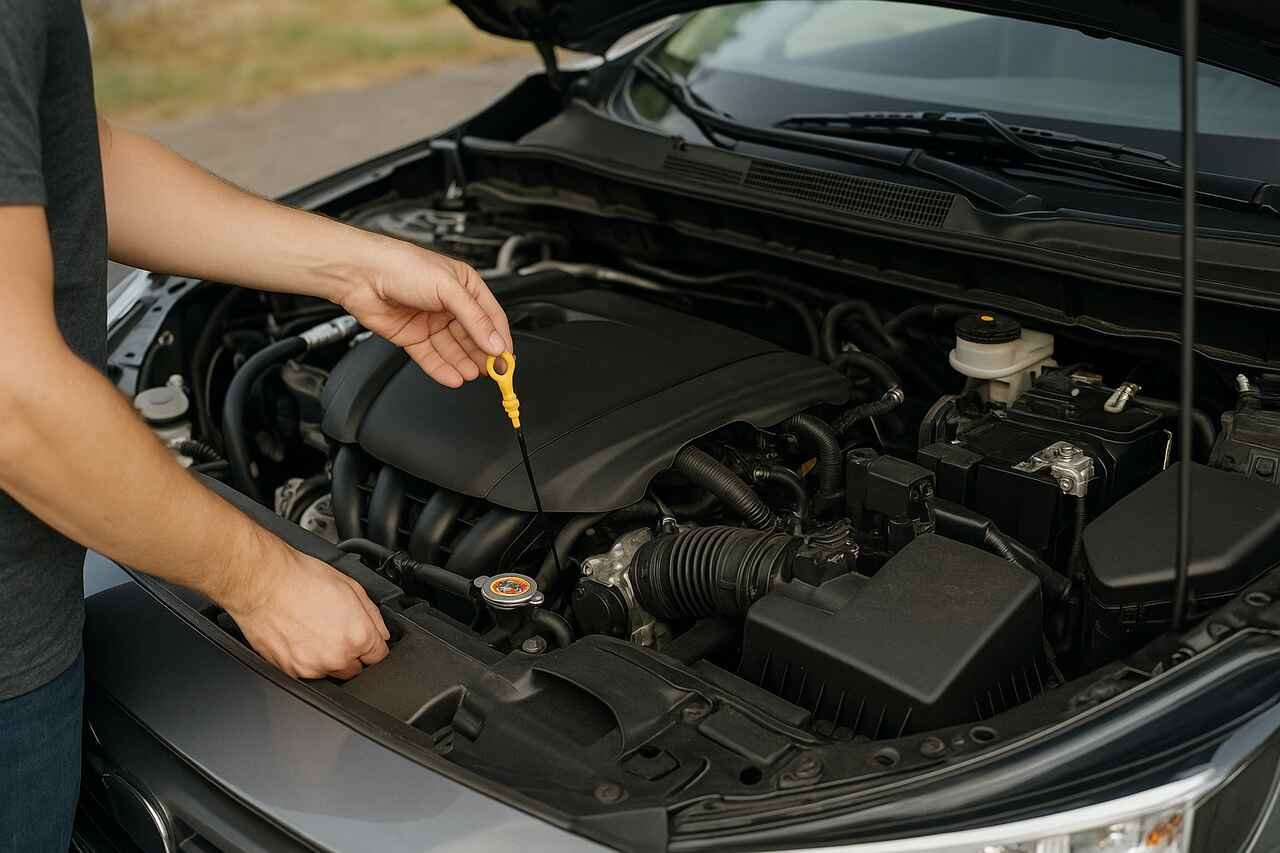
Begin by opening your vehicle’s hood using the release lever inside the car, then secure it with the prop rod. The dipstick handle is typically brightly colored most commonly yellow or orange to make it easy to identify. In some newer vehicles, it may have the word “Oil” printed on it. Pull it out gently and hold it away from the engine area to prevent any oil drips on hot parts.
Next, take your clean rag and wipe off the oil from the dipstick. This first cleaning removes any residue left from engine splashes, allowing you to get a fresh reading. Once it’s clean, insert the dipstick back fully into the tube, then pull it out again slowly. You’ll now see the oil level on the end of the stick.
Identifying the Dipstick Marks
Most dipsticks have two notches or holes, labeled as “MIN” and “MAX.” The oil level should be between these two marks. If it’s close to or below the minimum line, the oil needs topping up. Ideally, the level should rest just below the maximum mark.
Common Dipstick Placement by Car Type
In front-wheel-drive cars, the dipstick is usually positioned toward the front of the engine bay for easy access. In rear-wheel-drive cars, it’s often found toward the back. For hybrid or luxury cars, the dipstick may be slightly hidden, so check your owner’s manual for exact placement.
Evaluate the Oil Level and Quality
Once you have removed the dipstick, it’s time to evaluate both the level and the condition of the oil. These two indicators reveal how well your engine is being maintained.
If the oil mark is below the “MIN” line, it’s a sign that your engine oil is low and needs to be refilled immediately. A proper oil level ensures smooth lubrication of all moving engine parts. If the level is within the recommended range, that’s a good indication that your engine has the right amount of oil.
Next, observe the oil’s color and consistency. Fresh, clean oil is usually amber or light brown, while darker oil suggests it has been used for a long period. Thick, black, or gritty oil means it’s time for a change. If you notice metallic particles, that could be an early sign of internal wear, while a milky or frothy texture may indicate coolant contamination.
Understanding Oil Color Variations
Oil color tells a lot about your engine’s condition. Golden or light brown oil means the oil is clean and doing its job well. Dark brown oil is still functional but nearing its change interval. Black oil indicates contamination, and milky oil can be a symptom of a blown head gasket or coolant leak.
Checking for Oil Contaminants
When inspecting the dipstick, rub a small amount of oil between your fingers. If it feels gritty, your oil filter may not be performing effectively. Dirt, metal shavings, or sludge in the oil are warning signs of possible engine wear or insufficient maintenance.
Add Engine Oil if the Level Is Low
When you find the oil level below the minimum mark, topping it up is necessary to prevent damage.
Locate the oil filler cap on top of the engine. It usually features an oil can symbol and may also list the recommended oil grade. Remove the cap and insert a funnel to prevent spills. Slowly pour a small amount of oil into the engine, then wait a few minutes before rechecking the level using the dipstick. Continue adding small amounts until the oil level reaches between the minimum and maximum marks.
Avoid the temptation to overfill, as too much oil can cause foaming, pressure buildup, and leaks. Once you reach the correct level, securely tighten the oil filler cap to prevent air leaks or contamination.
Choosing the Correct Oil Type
The correct oil type depends on your vehicle’s specifications and driving conditions. Most modern cars require synthetic or semi-synthetic oil. Viscosity ratings such as 5W-30 or 10W-40 describe the oil’s thickness at different temperatures. Always refer to your vehicle’s manual or the manufacturer’s website for accurate recommendations.
Avoiding Overfilling Mistakes
Adding too much oil can harm your engine just as much as having too little. Overfilled oil creates pressure that can blow seals or cause the crankshaft to whip the oil into foam, reducing lubrication. Always add oil in small amounts, checking after each pour to maintain proper levels.
Inspect Oil Condition Regularly to Prevent Engine Damage
Checking oil isn’t a one-time task it’s an ongoing responsibility. Regular inspections ensure your engine remains protected and efficient.
Oil degrades over time due to heat, friction, and contaminants. By checking it regularly, you can catch issues such as leaks or excessive consumption early. Doing so not only prolongs engine life but also improves fuel efficiency and overall performance.
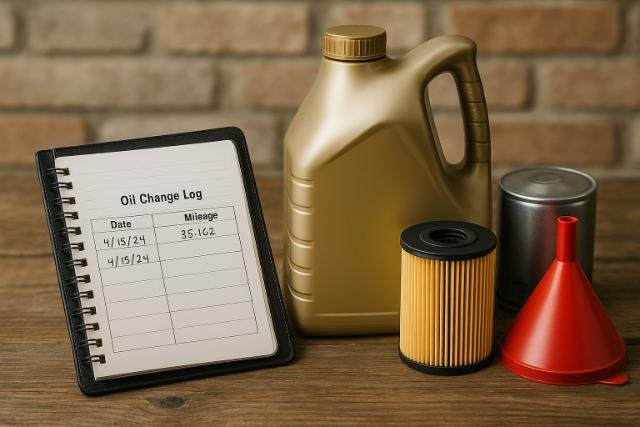
Keep track of how much oil your car consumes between changes. Sudden drops in oil levels could indicate internal leaks or worn piston rings. Keeping a small maintenance log will help identify these patterns before they turn into costly repairs.
Recommended Oil Check Frequency
For most modern vehicles, checking the oil every 3,000 to 5,000 miles is adequate. However, if your car is older, high-mileage, or driven in extreme conditions, it’s wise to inspect every 1,000 to 2,000 miles. Always perform a check before a long road trip.
Recognizing Early Warning Signs
Warning lights on your dashboard, a burning oil smell, or knocking noises from the engine are red flags. These symptoms often mean your oil is too low or too old to lubricate effectively. Act quickly to prevent permanent damage.
Use a Maintenance Schedule for Consistent Performance

Creating a maintenance routine helps you stay consistent and prevents forgetting crucial checks.
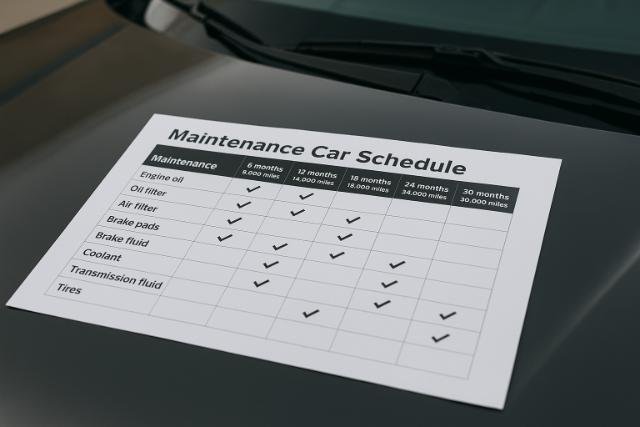
Include oil inspections in your monthly vehicle care checklist. Alongside oil checks, also monitor other fluids like coolant, brake fluid, and transmission fluid. Maintaining a strict schedule ensures all systems work harmoniously and reduces the risk of unexpected breakdowns.
Digital tools and car maintenance apps can make this process easier. They can remind you of service intervals, oil change dates, and inspection tasks based on mileage or time.
Creating a Car Maintenance Checklist
A proper checklist includes oil checks, tire pressure monitoring, battery inspection, brake system review, and coolant level verification. Keeping all these points in one place makes maintenance organized and efficient.
Using Digital Maintenance Trackers
Apps such as CARFAX Car Care and AUTOsist allow you to log oil changes, track maintenance costs, and receive reminders. This digital approach ensures you never miss an essential service again.
Keep Track of Oil Changes and Choose the Right Products
Maintaining detailed records of your oil changes builds a clear history that benefits both you and your vehicle.
Write down the date, mileage, oil brand, and type each time you change or top up the oil. This log helps mechanics diagnose problems more efficiently and preserves your car’s resale value. When choosing oil products, always go for reputable brands that meet the American Petroleum Institute (API) or European Automobile Manufacturers’ Association (ACEA) standards.
High-quality oils ensure better lubrication, less sludge formation, and improved engine longevity. Over time, this simple habit contributes significantly to your car’s overall reliability.
Benefits of Recordkeeping
Keeping maintenance records helps with warranty validation and boosts resale credibility. It also gives you a clear timeline of when the next service is due, making maintenance predictable and stress-free.
Comparing Oil Brands and Certifications
| Oil Brand | Type | Certification | Recommended For |
| Mobil 1 | Full Synthetic | API SN, ILSAC GF-6 | High-performance vehicles |
| Castrol EDGE | Synthetic | ACEA A5/B5 | Everyday driving |
| Valvoline | Conventional | API SN Plus | Older engines |
| Shell Helix Ultra | Synthetic | API SP | Modern engines |
Oil Color and Condition Guide
| Oil Color | Condition | Meaning | Action Needed |
| Light Amber | Clean | Healthy oil | No action required |
| Dark Brown | Used | Slightly aged oil | Check soon |
| Black | Dirty | Contaminated oil | Change immediately |
| Milky | Contaminated | Coolant leakage | Visit mechanic |
Conclusion
Learning how to check oil in a car is a valuable skill that every driver should master. By following these detailed steps, you ensure that your engine remains properly lubricated and protected. Regular oil checks prevent damage, save money, and extend your car’s lifespan. When you make oil inspection part of your maintenance routine, your vehicle will reward you with smoother performance, better fuel efficiency, and long-term reliability.
FAQ’s
It’s best to check your oil at least once a month or before any long trip. Frequent checks help you detect leaks or low levels early.
No, always let the engine cool for 5 to 10 minutes after turning it off. This allows the oil to settle and gives a more accurate reading.
Too much oil can cause foaming, excessive pressure, and seal damage. Always add in small increments and recheck the dipstick.
Dark oil isn’t always harmful, but thick or gritty oil means it’s old and should be replaced.
It’s best not to mix oils with different formulas or viscosities. Doing so can reduce performance and lubrication efficiency.
Refer to your owner’s manual for the recommended grade and viscosity. Factors like climate, mileage, and driving habits can also influence your choice.


