

A car battery is the central energy source for any vehicle. It provides the initial electrical power to start the engine and supports systems like headlights, ignition, air conditioning, and infotainment. Over time, however, batteries lose their charge due to cold weather, prolonged parking, or electrical drain from accessories left on. When your vehicle struggles to start or shows dim lights, knowing how to charge a car battery properly becomes essential. This complete guide will teach you how to recharge your battery safely, explain what tools you need, and help you understand each part of the process in detail. By mastering this skill, you can extend your battery’s lifespan, save money, and ensure your car remains dependable in any condition.
Gather the Required Tools and Safety Equipment
Before starting, preparation is the foundation of safe and efficient charging. Car batteries store a significant amount of electrical energy, and improper handling can cause sparks, acid leaks, or short circuits. To avoid such risks, you must first gather all the necessary tools and safety items.
You will need a suitable battery charger, jumper cables (if you are using another vehicle for charging), protective gloves, safety goggles, and a clean rag. Ensure your charger matches your battery type because lead-acid, absorbed glass mat (AGM), and lithium-ion batteries each require different voltage and current settings. Using the wrong charger can result in undercharging, overheating, or permanent damage.
Always perform the charging process in a well-ventilated area. Charging releases hydrogen gas, which can ignite in enclosed spaces. Open your garage door or move your car outdoors to prevent gas accumulation. It is also recommended to disconnect the battery from the vehicle before charging to protect the car’s sensitive electrical circuits.
Identify the Battery Type and Voltage Rating
The first technical step is identifying your battery’s type and voltage. Most vehicles use a 12-volt lead-acid battery, but hybrid or electric vehicles may use higher voltages. Check the battery label or consult your vehicle manual to confirm its specifications. This information will help you select the correct charger setting and avoid overcharging or undercharging.
Knowing the battery chemistry is also important. Lead-acid batteries are the most common, but some modern cars use AGM or lithium-ion types. Each reacts differently to charging currents, so make sure your charger supports your battery’s chemistry.
Inspect the Battery for Damage or Leaks
Before connecting any cables, carefully inspect your battery for signs of physical damage. Look for cracks, bulges, acid leaks, or corrosion around the terminals. If you notice any swelling or fluid leakage, do not attempt to charge it, as this indicates internal failure or overpressure. Instead, replace the battery. A simple five-minute inspection can prevent accidents and help you determine whether the battery is worth charging.
Clean and Prepare the Battery Terminals
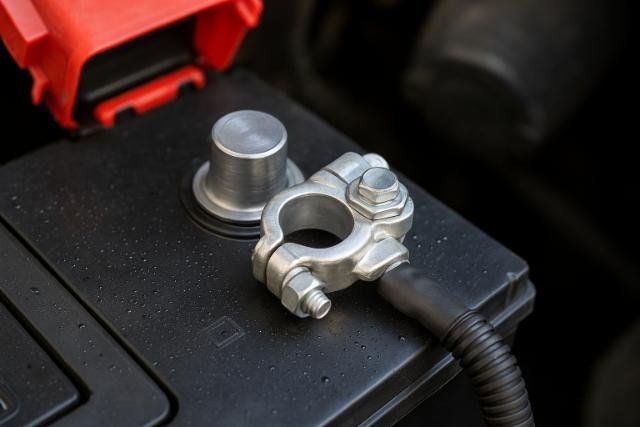
Good electrical contact between the charger clamps and the battery posts is essential for proper current flow. If the terminals are covered in corrosion or dirt, the electricity cannot flow efficiently, which leads to longer charging times and reduced effectiveness.
To begin, disconnect the negative (black) cable first, followed by the positive (red) cable. This sequence minimizes the risk of accidental short circuits. Use a wire brush or sandpaper to clean the terminals thoroughly. You can also apply a mixture of baking soda and water to neutralize any acid residue. After cleaning, wipe the terminals with a dry cloth.
Clean connections not only help during charging but also improve your car’s performance in general. Corrosion increases electrical resistance, causing voltage drops that can affect your starter and electrical accessories.
Use Protective Grease to Prevent Future Corrosion
Once the terminals are clean and dry, apply a small amount of dielectric grease or petroleum jelly to the posts. This layer acts as a barrier between the metal and moisture, reducing the chance of corrosion forming again. This step is often overlooked but is highly effective for long-term maintenance.
Keeping terminals clean and protected ensures a strong electrical connection, better starting performance, and consistent battery health.
Ensure Secure and Polarity-Correct Connections
When reconnecting or attaching the charger clips, double-check that the red clamp connects to the positive terminal and the black clamp connects to the negative terminal. Mixing them up can cause sparks or serious damage to the car’s electrical system. Always tighten the connections securely to ensure that the clamps do not slip during charging.
Connect the Charger to the Battery Safely
Once your battery is clean and ready, the next stage is connecting the charger correctly. Start by ensuring that the charger is switched off. This prevents current from flowing while you attach the cables, which could cause sparks or damage.
Attach the positive (red) clamp of the charger to the positive terminal of the battery. Next, attach the negative (black) clamp to the negative terminal or to a grounded, unpainted metal surface on the car’s body. Grounding to the chassis helps reduce the risk of sparks forming near the battery, especially when gases are present.
After you make the connections, make sure the cables are not touching any moving engine parts or sharp metal edges.
Check the Charger’s Voltage and Amperage Settings
Every charger has settings that control voltage and current output. For most cars, the correct voltage setting is 12 volts. The amperage setting determines how fast the battery will charge. A low amperage setting (around 2 to 10 amps) provides a slow, steady charge that fully restores the battery without overheating. A higher amperage setting (10 to 20 amps) can charge faster but may cause heat buildup, which can shorten battery life if done frequently.
Choose the slow charge option whenever possible. It may take longer, but it gives the battery time to absorb the charge evenly, improving its long-term capacity.
Understand Automatic vs. Manual Chargers
Automatic chargers are designed for convenience and safety. They automatically monitor the battery’s voltage and stop charging once it is full. This prevents overcharging and damage. Manual chargers, however, require you to monitor the voltage and disconnect the charger manually once the battery is charged. While manual chargers are usually cheaper, they demand constant attention to prevent overheating. For most drivers, an automatic charger is the safer and more reliable option.
Start the Charging Process Gradually
After everything is connected properly, you can begin charging. Turn on the charger and set it to the appropriate mode. Charging typically takes several hours depending on the battery’s condition and size. It is best to start with a low current and increase it only if necessary.
During the charging process, the battery converts electrical energy into chemical energy. You might notice gentle bubbling sounds or a faint odor, which are normal byproducts of the process. However, if the battery becomes excessively hot or starts emitting strong smells, stop charging immediately and allow it to cool down.
Check on the battery every hour or two to ensure that the cables remain secure and that the charger is functioning normally.
Observe Charging Progress Using Indicator Lights or Gauges
Most modern chargers are equipped with indicator lights or digital screens that display the charging progress. A blinking light or a rising meter shows that charging is in progress, while a solid green light usually means the battery is fully charged. Understanding these indicators helps you monitor progress without constantly checking voltage manually.
Avoid Overcharging or Undercharging
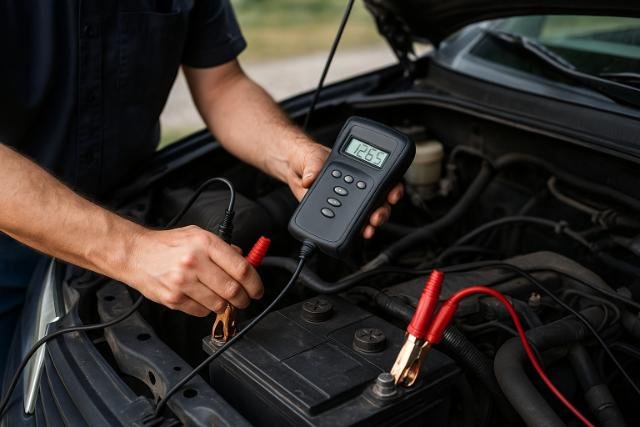
Charging should continue until the battery reaches approximately 12.6 to 12.8 volts. Overcharging can boil the electrolyte inside the battery and reduce its lifespan. Undercharging, on the other hand, may result in a weak battery that cannot hold a charge for long. Use a digital multimeter to check the voltage periodically and stop charging once the correct level is achieved.
Disconnect and Reinstall the Battery Properly
After your battery is fully charged, the next step is to disconnect it safely. Always turn off the charger first. Then remove the negative clamp followed by the positive clamp. This sequence minimizes the chance of sparks or electrical shorts.
If you removed the battery from the car before charging, clean the battery tray and surrounding area before reinstalling it. Place the battery securely in its compartment and tighten the hold-down clamps to prevent vibration during driving. Reconnect the positive cable first and the negative cable last.
Proper reinstallation ensures that your battery remains stable, properly grounded, and safe for use.
Inspect for Post-Charging Leaks or Heat
Once reinstalled, feel the sides of the battery gently. It should be cool or slightly warm, but never hot. Also, check for any visible signs of fluid leakage or bulging. If you find anything unusual, do not start your car. Have the battery checked by a professional to avoid damage to your electrical system.
Recheck Voltage with a Multimeter
Before you attempt to start your engine, use a multimeter to check the battery voltage again. A healthy, fully charged battery should show a reading between 12.6 and 12.8 volts. If the voltage is lower than 12.4 volts, the battery may not have fully charged or could be nearing the end of its life.
Test the Battery Performance After Charging
Charging restores power, but testing ensures that your battery can deliver it effectively. After charging, start your engine and observe how it performs. A smooth, quick start usually means your battery is in good shape. If the starter struggles or you hear clicking sounds, the battery might still be weak.
You can also use a load tester to simulate the demands placed on the battery during engine startup. This test measures how well the battery maintains voltage under stress.
Perform Load Testing for Accurate Diagnosis
A load test involves applying a fixed current to the battery while monitoring how the voltage drops. A healthy battery should not drop below 9.6 volts during the test. If it does, that means it cannot deliver enough current and should be replaced soon.
Load testing is a more accurate way to evaluate battery performance than simply measuring voltage alone because it replicates real driving conditions.
Evaluate Alternator and Charging System
Even a good battery can drain quickly if your alternator or charging system is faulty. Start the engine and use your multimeter to measure voltage at the terminals. It should read between 13.7 and 14.7 volts when the alternator is working correctly. If it reads lower, the alternator may not be charging the battery properly, leading to repeated discharge.
Maintain Regular Charging and Prevent Future Battery Drain
Charging your battery occasionally is not enough. Consistent maintenance ensures it stays in good health for years. Batteries naturally discharge over time, even when not in use. Regular driving helps the alternator keep the battery topped up, but if your car sits unused for long periods, the charge will drop.
To prevent this, you can use a trickle charger or battery maintainer. These devices provide a very small, continuous current that keeps the battery at full capacity without risk of overcharging. It is an ideal solution for vehicles stored for the winter or those used only occasionally.
Use a Trickle Charger for Long-Term Storage
If your car will be parked for more than two weeks, a trickle charger can help maintain the charge level. It slowly feeds energy into the battery, counteracting the natural loss that occurs over time. Trickle chargers are simple to use and highly effective in preventing battery failure caused by deep discharge.
Monitor Battery Health with Smart Chargers
Modern smart chargers do more than just charge. They diagnose, maintain, and even repair minor sulfation issues in lead-acid batteries. They automatically adjust voltage and current, making them safer and more efficient than traditional chargers. By investing in a smart charger, you can extend your battery’s lifespan significantly and reduce the chances of unexpected breakdowns.
Common Charging Methods Compared
| Charging Method | Charging Speed | Best For | Advantages | Disadvantages |
| Trickle Charging | Slow | Long-term storage | Prevents overcharge and extends life | Takes longer to charge completely |
| Fast Charging | Fast | Emergency use | Saves time and quickly restores power | Can shorten battery lifespan |
| Automatic Smart Charging | Moderate | Regular vehicle maintenance | Stops automatically, analyzes battery health | More expensive initially |
| Jump Starting | Instant | Emergency start only | Quick and easy | Not suitable for full recharging |
Key Voltage and Charging Time Reference
| Battery Capacity (Ah) | Recommended Charging Amps | Estimated Charging Time | Fully Charged Voltage |
| 40 Ah | 4 Amps | 10 to 12 Hours | 12.6 to 12.8 Volts |
| 60 Ah | 6 Amps | 8 to 10 Hours | 12.6 to 12.8 Volts |
| 80 Ah | 8 Amps | 8 to 10 Hours | 12.6 to 12.8 Volts |
| 100 Ah | 10 Amps | 10 to 12 Hours | 12.6 to 12.8 Volts |
Conclusion
Understanding how to charge a car battery is a valuable skill for any car owner. It not only saves you from inconvenient breakdowns but also helps maintain the health and reliability of your vehicle. By following each step carefully from preparation, cleaning, and connection to monitoring, testing, and maintenance you ensure safe and efficient charging every time. Regular maintenance with the help of smart chargers or trickle chargers keeps your battery strong, especially during long periods of inactivity. With proper care and attention, your car battery can serve you well beyond its expected lifespan.
Explore more insightful and valuable content on our blog journalingtechniques! Stay updated with helpful tips, expert advice, and in-depth articles that enhance your knowledge.
FAQ’s
It usually takes between 8 and 12 hours to fully charge a dead car battery using a standard 6-amp charger. Fast chargers can do it faster, but slow charging is safer and more effective.
Yes, you can, but it is safer to disconnect it to protect the car’s electrical components. Always turn off the ignition and accessories before connecting the charger.
Use a voltmeter or multimeter to measure voltage. A fully charged battery will show between 12.6 and 12.8 volts at rest.
Overcharging can cause excessive heat, evaporate the electrolyte, and lead to internal damage. Always monitor the charger or use an automatic one that shuts off when full.
If your battery keeps losing charge, your alternator may not be working correctly, or there could be a parasitic drain from lights, alarms, or electronics left running.
If you drive your car regularly, the alternator keeps the battery charged. For cars that sit unused for more than two weeks, a trickle or smart charger should be used to maintain charge levels.