


Jumping a car is a practical skill that gets you moving when a battery dies. This guide gives a clear, step by step method to jump start most vehicles, covers the tools and safety checks you need, explains common variations, and helps you troubleshoot if things do not go as planned. Read through the full procedure, follow the safety points, and use the checklists and tables to be prepared.
Prepare Safety Gear and Inspect Both Vehicles


Start by making safety your first priority. Before touching cables or batteries, put on safety glasses if you have them and gloves if available. Ensure both vehicles are in park or neutral with parking brakes set and keys out of the ignitions. Work in a well ventilated area and avoid smoking or open flames near the batteries.
Inspect the batteries and terminals for heavy corrosion, cracks, or leaking fluid. If either battery is cracked or leaking, do not attempt a jump. Check that the jumper cables are in good condition with solid clamps and insulated wiring. Confirm that both vehicles have compatible 12 volt electrical systems. For hybrid vehicles and some European cars consult the owner manual because their power systems can differ.
Context matters. If you are on a roadside choose a flat, safe area away from traffic. If visibility is low use hazard lights and reflective triangles. Be mindful of weather. In extreme cold battery performance drops and connections can be stiff. In wet conditions keep connections dry and work under cover if possible. If you feel uncertain at any step, get professional help.
Safety Check List
Visual battery inspection
- Look for cracks, swelling, white or blue powdery corrosion, and wetness.
- If present, call roadside assistance.
Vehicle readiness
- Confirm both vehicles are turned off, parking brakes engaged, transmissions in park or neutral, and keys removed from ignitions.
Tools and Protective Gear
Essential tools
- Quality jumper cables rated for automotive use and a portable battery pack if available.
- Flashlight and reflective vest or hazard triangles for roadside safety.
Protective gear
- Safety glasses, gloves, and a cloth to clean terminals if needed.
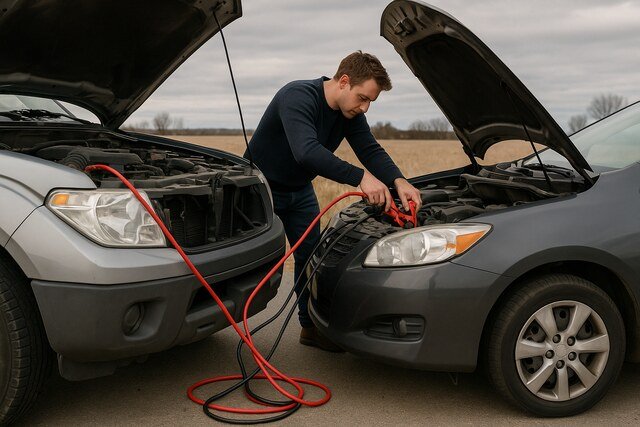
Position the Donor Vehicle and Connect Ground

Place the donor vehicle close enough so the jumper cables reach both batteries without stretching. Align the cars nose to nose or side by side depending on cable length, but ensure they do not touch as a precaution. Park both vehicles, engage parking brakes, and set transmissions to park or neutral.
Open both hoods and locate the batteries. Some modern cars hide the battery under a cover or in the trunk. If the battery is not obvious, locate the jump terminals which the manufacturer provides. Identify the positive terminal marked with a plus sign and often a red cover. Identify the negative terminal or an appropriate metal ground on the engine block or chassis; many manufacturers recommend clamping to a clean unpainted metal surface away from the battery.
Variation: if you have a portable jump starter follow the manufacturer connection instructions. For vehicles with separate 12 volt connectors near the engine bay use those points instead of the battery terminals. Always avoid connecting negative to negative on the batteries directly if the manual advises otherwise. Some hybrid and newer vehicles require special procedures found in the owner manual.
Positioning Tips
Distance and alignment
- Keep vehicles close but not touching.
- Leave room to open hoods fully.
Engine off position
- Donor engine and all accessories off until connection complete.
Choosing a Ground Point
Where to clamp negative
- Clean, unpainted metal bracket on the engine block or chassis.
- Avoid fuel lines, moving parts, and painted surfaces.
Why ground matters
- Grounding away from the battery reduces spark risk near leaking gases.
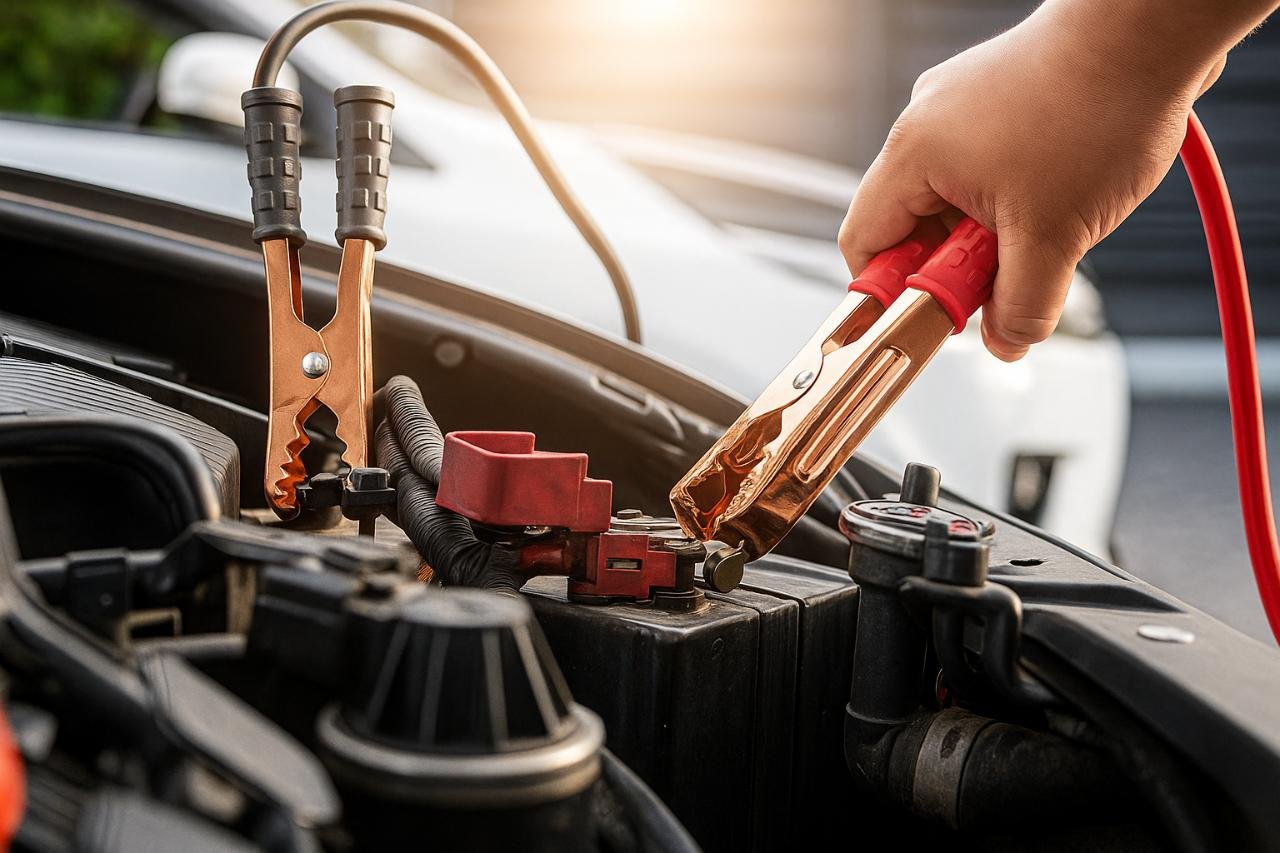
Connect Jumper Cables Correctly
Grab the jumper cables and lay them out so they do not tangle. Identify the red clip for positive and the black clip for negative. Attach the red positive clamp to the positive terminal on the dead battery first. Then attach the red positive clamp to the positive terminal on the donor battery.
Next attach the black negative clamp to the donor battery negative terminal. Do not attach the final black clamp to the dead battery negative terminal. Instead clamp the black negative clip to a clean, unpainted metal surface on the dead car away from the battery, such as a bolt or unpainted bracket. This minimizes the chance of sparks near the battery and improves safety.
If clamps are reversed the result can be severe electrical damage. Double check polarity before starting any engines. If a spark occurs when connecting the final clamp, back off and re-evaluate. For portable jump packs follow the pack instructions and ensure the pack is off while attaching clamps.
Clamp Order and Rationale
Correct order to attach
- Red to dead positive, red to donor positive, black to donor negative, black to grounded point on dead car.
- Reverse order when disconnecting.
Why this order
- Prevents sparks near the battery and reduces the risk of overvoltage to sensitive electronics.
Common Mistakes With Clamps
Reversing polarity
- Can damage alternators, electronics, and fuses.
- If you suspect reversal, stop and do not start either vehicle.
Loose or corroded clamps
- Poor connection can prevent charging.
- Clean terminals with a wire brush or cloth before attaching if necessary.
Start the Donor Vehicle and Run to Charge
Start the donor vehicle and let it run at idle for a few minutes. Running the engine allows the donor alternator to produce current and charge the dead battery. Keep fans, headlights, heaters, and other electrical loads off to maximize charging to the dead battery.
Let the donor vehicle run for about 3 to 5 minutes for a moderately depleted battery. If the dead battery is severely drained, allow up to 10 minutes. Revving the donor engine slightly can raise alternator output but do not exceed idle too much; a light blip to 1500 rpm is fine. Monitor the connections for heat or smoke. If you smell burning or see heavy smoke, turn both engines off and disconnect immediately.
Be aware that some modern vehicles have sensitive electronics and quick charging via jump can stress systems. For these cars consult the owner manual. Also note that if the battery is old, swollen, or cannot hold a charge, the jump may start the car but the battery can fail again soon after.
Charging Duration
Short charge
- 3 to 5 minutes for a mild discharge.
- Try to start after this period.
Longer charge
- 7 to 10 minutes for deeper discharge but monitor heat.
Donor Vehicle Behavior
Engine idle stability
- Maintain steady idle.
- Avoid high rpm for prolonged periods.
Electrical load management
- Turn off accessories to prioritize battery charging.
Start the Dead Vehicle and Troubleshoot if Necessary
Attempt to start the dead vehicle after the charging period. Turn the key or press the start button while ensuring the transmission is in park or neutral. If it starts, leave both engines running and monitor for normal idle. If it does not start after a couple of attempts, wait a minute and try again. Avoid cranking continuously for long stretches to prevent starter damage.
If the car still will not start, double check the cable connections, ground contact, and clamp tightness. If everything is connected properly and it still fails, the battery may be beyond a jump or the starter or ignition system may be at fault. In these cases call for professional help or tow the car to a repair facility.
Once the dead car starts, keep it running for at least 15 to 30 minutes or take a short drive to allow the alternator to recharge the battery. If the car struggles to start again later, the battery may need replacement or alternator charging might be insufficient. Have the battery and charging system tested soon.
If the Car Starts
Immediate steps
- Keep both engines running and let the newly started car stabilize.
- Carefully observe dash lights and listen for abnormal noises.
Post-start drive
- Drive for 20 to 30 minutes if possible to recharge the battery.
If the Car Does Not Start
Recheck connections
- Ensure clamps are clean, tight, and not reversed.
- Check ground clamp contact.
Next actions
- Attempt a few more short starts, call roadside assistance, or replace battery.
Disconnect Cables and Perform Final Checks
When both vehicles are running and stable, disconnect the cables in the reverse order of connection. Remove the black clamp from the grounded metal on the previously dead car first, then the black clamp from the donor battery. Next remove the red clamp from the donor battery and finally the red clamp from the previously dead battery. Keep clamps from touching each other or metal surfaces while removing.
Inspect the cables and terminals after removal. If terminals remain corroded clean them with a brush and apply a light coat of petroleum jelly to inhibit future corrosion. Check the previously dead car for electrical warnings on the dashboard and test headlights and accessories to confirm normal function.
If the car dies shortly after you disconnect cables, avoid repeated attempts. It likely indicates the battery cannot hold charge or the alternator is not working. Get a battery and charging system test at a service center. If the alternator is faulty, a new battery alone will not fix the problem.
Correct Disconnect Order
Reverse sequence
- Black from grounded point, black from donor negative, red from donor positive, red from dead positive.
- Keep cables clear of moving parts.
Why reverse matters
- Minimizes risk of accidental shorting when live clamps are handled.
Post-jump Inspection
Terminal maintenance
- Remove corrosion, tighten clamps, and protect terminals with grease.
- Replace badly corroded terminals.
Electrical system check
- Confirm dash indicators like battery or alternator lights are off.
- Test headlights and blower fan for normal operation.
Test, Document, and Plan Follow Up
After a successful jump keep an eye on the car for the next few days. If it requires frequent jumps, schedule a battery and charging system test. Batteries older than three to five years commonly fail. Document the battery age, any unusual symptoms, and the conditions when failure occurred. This helps technicians diagnose whether the issue is battery related or due to alternator, parasitic drain, or temperature effects.
If the battery needed repeated jumps immediately after charging, replace it. If the battery and alternator test normal but the battery still drains, investigate parasitic draws such as aftermarket electronics, trunk lights, or faulty relays. Keep a portable jump starter in your car as a precaution for future incidents.
For long term care, regularly inspect battery terminals, keep the battery secure to prevent vibration damage, and avoid leaving lights on. In cold climates consider a battery blanket or storing a trickle charger for seasonal vehicles. Routine battery maintenance can extend life and reduce roadside surprises.
Monitoring After Jump
Short term
- Watch for restart issues within 24 to 72 hours.
- Note any warning lights.
Long term
- Schedule battery and alternator test within a few days if problems persist.
Documentation and Replacement
What to record
- Battery age, date of jump, and symptoms observed.
- Any dashboard codes or warning lights.
Replacement triggers
- Repeated failure to hold charge, visible damage, and age beyond manufacturer recommendation.
Primary Entities and Sub-entities Tied to Jump Starting
Below are the main entities related to the topic and four sub-entities for each with brief explanations. This helps you understand the parts and systems involved.
Battery
- Chemistry: lead acid, AGM, gel. Different chemistries have different charging profiles.
- Voltage: 12 volt nominal for most cars. Two 6 volt batteries may be used in some setups.
- Capacity: Amp hour rating that impacts how long the battery will supply current.
- Age and condition: Older batteries lose capacity and may fail to take a charge.
Jumper cables and connectors
- Gauge: wire thickness influences current capacity. Lower gauge numbers mean thicker wire.
- Clamp quality: solid clamps with good teeth reduce resistance.
- Insulation: high quality insulation prevents shorts and improves safety.
- Length: longer cables give flexibility but may increase resistance.
Donor vehicle and alternator
- Alternator output: measured in amps; higher output charges faster.
- Engine running behavior: stable idle supports better charging.
- Battery size: larger donor batteries can supply higher current.
- Electrical load: turning off accessories on donor helps charge the dead battery more effectively.
Grounding and chassis
- Ground points: clean, unpainted metal surfaces on engine or chassis.
- Corrosion at ground: increases resistance and reduces charging efficiency.
- Spark risk: improper ground near battery increases spark hazard.
- Structural accessibility: some cars restrict access; use recommended ground points.
Starter and ignition
- Starter motor condition: failing starters may not engage even with good battery.
- Solenoid behavior: solenoid links battery to starter; issues cause no crank.
- Wiring integrity: broken or corroded wires prevent current flow.
- Key and immobilizer systems: electronic locks may prevent start even with power.
Safety equipment
- Eye protection: prevents acid or debris injury.
- Gloves: protect from acid and heat.
- Reflectors and hazard lights: keep you visible roadside.
- Fire extinguisher: Class B or ABC for battery fires.
Diagnostics and accessories
- Multimeter: checks voltage and confirms charging.
- Load tester: tests battery capacity under load.
- Portable jump starter: avoids needing another vehicle.
- Battery terminal cleaner: improves connection quality.
Tables for Quick Reference
| Jumper Cable Gauge | Suitable vehicle types | Typical recommended length |
| 2 gauge | Large trucks, SUVs, heavy duty | 12 to 20 feet |
| 4 gauge | Small trucks, larger sedans, SUVs | 10 to 16 feet |
| 6 gauge | Standard sedans and small cars | 8 to 12 feet |
| 8 gauge | Very small or compact cars, emergency use | 6 to 10 feet |
Conclusion
Knowing how to jump a car safely keeps you moving and reduces stress during roadside battery failures. Follow the step by step process: prepare safely, position vehicles, connect cables in the correct order, charge with the donor engine, start the dead car, disconnect carefully, and perform follow up checks. Keep quality cables or a portable jump starter available, maintain battery terminals, and test the battery and charging system when issues persist. With practice and preparedness you can handle most dead battery scenarios confidently.
Explore more insightful and valuable content on our blog journalingtechniques! Stay updated with helpful tips, expert advice, and in-depth articles that enhance your knowledge.
FAQ’s
No. Most passenger vehicles use 12 volt systems. Do not jump between systems with differing voltages or between 6 volt and 12 volt batteries.
If done correctly the risk is low. Reversing polarity or making poor connections can damage electronics. For newer cars consult the owner manual for recommended procedures.
Drive 20 to 30 minutes at highway speeds if possible to allow the alternator to restore charge. Short idling may not fully recharge a depleted battery.
Yes. Portable jump starters are safe and convenient. Follow the device instructions and confirm the unit has adequate capacity for your vehicle.
For most cars a 4 or 6 gauge cable works well. For SUVs, trucks, and heavy duty vehicles choose 2 or 4 gauge to ensure sufficient current.
It likely indicates a failing battery or a charging system issue such as a bad alternator. Have the battery and alternator tested at a service center.


